Tuesday, 26 March 2019

Update Drupal Core software with Drush/Admin Interface

Update Drupal 8 Core software

Requirement: Drush (If want to update with the help of Drush)
Note: In case of live site, test this process development environment before running on production environment.

Follow below steps:
1. Take complete backup of site.
2. Edit settings.php (/sites/default/settings.php) in notepad++ or any text editor. Find  "$settings[update_free_access]" variable. By default, due to security reasons, it is set "FALSE". 
Update this variable to "TRUE" as below:
$settings['update_free_access'] = TRUE;
3. If you are using any caching technique, Disable it.
4. Put your site in maintenance mode by going to admin > configuration > Development > Maintenance Mode url is /admin/config/development/maintenance.
5. If composer is already in used to manage dependencies, Run the composer update and visit the http://www.example.com/update.php in browser. Now click continue in the first screen to run the updates and successfully complete the script.

6. If you are not using composer then follow below steps.
     a. Download the latest Drupal core file from the drupal.org Drupal Core Software. 
     b. Extract downloaded file in any temp folder.
     c. Delete the core and vendor directory and all files that are not in sub-directory like .htaccess, composer.json and autoload.php. Do not delete custom files which you have created or customized.
     d. Copy core, vendor directory as well all non-custom files(that are deleted) from temp directory to site directory.
     e. Visit http://www.example.com/update.php. Click continue in the first screen to run the updates. Run the Drush command: drush updb   
     f. If there is any error or warning, re-run the update.php again till all the updates have been completed successfully.
7. Update again settings.php file with "FALSE" value of the variable $settings['update_free_access'] as below : $settings['update_free_access'] = FALSE;
8. Now put your site out of maintenance mode by going to admin > configuration > Development > Maintenance Mode url is /admin/config/development/maintenance.
9. Clear cache.
10. Enable caching techniques which is disabled before update.
11. Now verify the updated version by going to the admin > Reports > Status Report.


Monday, 25 March 2019

Integrate Kafka with Drupal 8

Integrate Kafka with Drupal 8

Kafka:

Kafka is publish-subscribe messaging system. It is used in real-time streaming data architecture provide real-time analytics. It is fast, scalable, durable, and fault-tolerant. 

Kafka is used for stream processing, website activity tracking, metrics collection and monitoring, log aggregation, real-time analytics, replay messages, error recovery, guaranteed distributed commit log for in-memory computing (microservices) etc.

Requirements:
  • Zookeeper and kafka installation.
  • "librdkafka" client library.
  • "php-rdkafka" PHP extension.
  • Drupal version >= 8.2.0
  • Drupal contributed module kafka.
Install Zookeeper & Kafka
Zookeeper
  • Installing apache zookeeper: Download zookeeper or wget http://www-us.apache.org/dist/zookeeper/zookeeper-3.4.10/zookeeper-3.4.10.tar.gz in "/opt/" and tar -zxvf.
  • create /opt/zookeeper_data directory by command "mkdir /opt/zookeeper_data".
  • cd zookeeper-3.4.10.
  • cd zookeeper-3.4.10/conf
  • rename or cp zoo_sample.cfg zoo.cfg
  • Now check for the properties in zoo.cfg file.
  • vim conf/zoo.cfg
  • Set following in zoo.cfg
  • dataDir : set it "/opt/zookeeper_data".
  • clientPort : set it 2181.
  • ./bin/zkServer.sh start
  • To verify status of zookeeper "jps".
  • If zookeeper has started successfully then process will appear with process id : "QuorumPeerMain" like 10956 QuorumPeerMain.

Kafka
  • To configure apache Kafka : Download kafka or wget http://www-us.apache.org/dist/kafka/1.0.0/kafka_2.11-1.0.0.tgz  in "/opt/" and tar -zxvf.
  • cd kafka_2.11-1.0.0/config
  • Now see file "server.properties" in config directory.
  • Edit server.properties with command : vi config/server.properties
  • Check for the properties in server.properties
  • Borker_id=1 (By default it is 1)
  • Port=9092 (If it is not present then by default it is 9092)
  • Zookeeper.connect=127.0.0.1:2181(If it is localhost then no need to update)
Now start apache kafka brokers


./bin/kafka-server-start.sh -daemon config/server.properties
Now check running kafka precesses by command "jps".


Create topic
./bin/kafka-topics.sh --create --zookeeper 127.0.0.1:2181 --topic test-topic --partitions 2 --replication-factor 1
 Output will : Created topic "test-topic".

Sending message
./bin/kafka-console-producer.sh --broker-list localhost:9092 --topic test-topic

After above commad type your message “Hi, its first test message.” And press enter.
Then press ctrl+z;

Consume message
./bin/kafka-console-consumer.sh --zookeeper 127.0.0.1:2181 --topic test-topic --from-beginning

Install rdkafka php extension
To install gcc: sudo apt-get install gcc
To install C++ compiler: sudo apt-get install g++
To install make: sudo apt-get install build-essential
To install phpize: sudo apt install php7.0-dev

Install librdkafka library.
git clone https://github.com/edenhill/librdkafka.git
cd librdkafka/
./configure
sudo make install
sudo pecl install rdkafka

Then go to Drupal root directory.

composer require enqueue/rdkafka
composer require nmred/kafka-php

Make entry of "extension=rdkafka.so" in etc/php/7.0/apache2/php.ini AND in etc/php/7.0/cli/php.ini.
Restart Apache.

Download and install drupal 8 contributed kafka module.
Create configuration in settings.php
Configure "settings.php" to expose kafka queue.
$settings['queue_default'] = 'queue.kafka';
$settings['queue_service_{queue_name}'] = 'queue.kafka';
$settings['kafka'] = [
  'consumer' => [
'brokers' => ['127.0.0.1']
  ],
  'producer' => [
'brokers' => ['127.0.0.1'],
  ],

];

Now you can check above created topic with drush command: drush kt

Now create custom module and use below code lines.

// Calling the Kafka producer service
$rk = \Drupal::service('kafka.producer');
$rk→setLogLevel(LOG_WARNING);

// Creating a topic.
$topic_name = 'kafka_test_topic';
$topic = $rk→newTopic($topic_name);

// Defining the content of the message (item)
$message = '{
  "title": "' . $nodetitle . '",
  "type": "' . $contenttype . '",
  "properties": {
    "node": {
      "nid": "' . $nodeid . '"
    }
  }
 }';
if ($topic) {
  // Pushing the topic in drupal queue.
  $q = \Drupal::queue($topic_name);

  //Creating the drupal QUEUE
  $q→createQueue();

  //Creating the message (item)
  $dev = $q->createItem($message);
}

Drupal 8 Custom module for kafka message
custom_kafka
custom_kafka.info.yml
custom_kafka.module

Now custom_kafka.info.yml
name: Custom kafka
description: custom module to integrate kafka with Drupal
package: custom
type: module
core: 8.x

custom_kafka.module
Now call below function to send kafka message on add/update/delete hook of entity.
/**
 * Function to set message in queue.
 *
 * @param string $topic_name
 *   Topic Name.
 * @param mixed $message
 *   Message.
 */
function kafka_message($topic_name, $message) {
  $topic_message = 'Topic_Name:' . $topic_name . ' #Message_Value:';
  try {
    $q = \Drupal::queue($topic_name);
    $q->createQueue();
    $q->createItem($message);
    $topic_message .= $message;
    \Drupal::logger('custom_kafka')->info($topic_message);
  }
  catch (Exception $ex) {
    $topic_message .= $ex->getMessage();
    \Drupal::logger('custom_kafka')->error($topic_message);
  }
}


Wednesday, 20 March 2019

Aggregator Module Configuration Drupal 8

Drupal 8 having aggregator module in its core.
Aggregator module allows to collect information from external sources and then publish this information on our website. This information can include RSS, RDF, or Atom feeds.
For example, if you want to publish a list of headlines and article summaries from an external news site, Use aggregator module.

RSS
  • RSS stands for Rich Site Summary. It is used to monitor rapidly changing information in an organized and user-friendly way on the web.
  • This monitors news sites, blogs, Twitter or Facebook pages, financial information, daily deals, classified sites and government alerts.
  • By posting a "feed" on their page, web site owners allows RSS readers to search their site continuously look for fresh and new information.
RDF
  • RDF stands for Resource Description Framework which describe resources on the web.
  • RDF is a standard model for data interchange on the web and it facilitates data merging even if the underlying schemas are differ.
  • RDF is designed to be read and understood by computers but not for being displayed to people.
  • RDF is written in XML.
  • Examples: Describing properties for shopping items, such as price and availability, Describing time schedules for web events, Describing information about web pages (content, author, created and modified date), Describing content and rating for web pictures, Describing content for search engines, Describing electronic libraries
Atom
  • Atom is a simple way to read and write information on the web, allows you to easily keep track of more sites in less time, and to seamlessly share your words and ideas by publishing to the web.
  • The Atom format was developed as an alternative to RSS.

Enable aggregator core module. 
Once enabled, the module provides a new screens for us to manage external site feeds.
See configuration page listed under "Web Services" sections


After clicking on the "Aggregator" link, it will take us to Feed overview page where existing feeds are listed and can be add new ones.


Example: Set up headline feed from the BBC news website having RSS feed link: http://feeds.bbci.co.uk/news/rss.xml?edition=uk
Click on "Add feed" and fill details as shown in image. 

Save new feed and will get confirmation message of feed creation.
Feed is empty because the Aggregator module only gets triggered to check for new content on a cron run. 
Run cron with the help of command drush cron or visit the feeds overview page.
Locate the BBC news feed just setup.
Open up the menu in the rightmost OPERATIONS column and click on the Update items button:
You should then see that the number of items is set.

NOTE: Aggreagtor module try to update your feed every hour but cron is set to 3 hours by default. So if you really wants to update feed every hour, then set cron to run once per hour.
Aggregator module provides a dedicated block for each feed which is created. Now we will add the BBC news block to Sidebar First region. 

To do this Navigate to Structure > Block Layout

Go to sidebar first region and click on the place block button, Select BBC news block as shown in screenshot. 


Choose the feed from the list "Select the feed that should be displayed". In this case it is —BBC News—
Save the block.
Now This block will start to appear on sidebar_first.


There is another screen provided by the Aggregator module by navigating to Manage > Configuration > Web Services > Feed aggregator (admin/config/services/aggregator).

Click on the Settings tab to see the details:


Now see the above BBC News block view.

Tuesday, 19 March 2019

Memcache Integration with Drupal 8

Memcache

Memcache improves Drupal application performance by moving standard caches out of the database and caching the results of other expensive database operations. Memcache stores these caches/DB objects in RAM.

Install memcache on the server and configure it with Drupal 8 to reduce the load on the database with every page load.

Install memcache on server
1. Run the following commands in terminal.
    sudo apt-get update
    sudo apt install memcached
    sudo apt install php-memcached
2. Run following command to make sure memcache daemon is working fine.
    ps aux | grep memcached
3. Create phpinfo.php page and check there "memcached" extension is properly configured in PHP7
    vim /var/www/html/phpinfo.php
4. Restart both memcached and php7-fpm services.
    service memcached restart
    service php7.0-fpm restart
    check in browser by opening above create phpinfo.php file.


5. After installing memcache in your server, download Memcache module and Memcache Storage Module. 
Memcache module having 2 submodules: 
1. Memcache  2. Memcache Admin. Enable memcache and memcache admin module.

Configure Memcache and Memcache Admin module Drupal 8
1. Add below configurations in settings.php file.
/**
 * Memcache settings
 */
$settings['memcache']['servers'] = ['127.0.0.1:11211' => 'default'];
$settings['memcache']['bins'] = ['default' => 'default'];
$settings['cache']['default'] = 'cache.backend.memcache';
$settings['memcache']['key_prefix'] = 'cms_memcache_';
$settings['cache']['bins']['bootstrap'] = 'cache.backend.memcache';
$settings['cache']['bins']['discovery'] = 'cache.backend.memcache';
$settings['cache']['bins']['config'] = 'cache.backend.memcache';
$settings['cache']['bins']['container'] = 'cache.backend.memcache';
$settings['cache']['bins']['data'] = 'cache.backend.memcache';
$settings['cache']['bins']['default'] = 'cache.backend.memcache';
$settings['cache']['bins']['dynamic_page_cache'] = 'cache.backend.memcache';
$settings['cache']['bins']['entity'] = 'cache.backend.memcache';
$settings['cache']['bins']['menu'] = 'cache.backend.memcache';
$settings['cache']['bins']['page'] = 'cache.backend.memcache';
$settings['cache']['bins']['render'] = 'cache.backend.memcache';
$settings['cache']['bins']['rest'] = 'cache.backend.memcache';
$settings['cache']['bins']['signal'] = 'cache.backend.memcache';
$settings['cache']['bins']['toolbar'] = 'cache.backend.memcache';
$settings['cache']['bins']['ultimate_cron_logger'] = 'cache.backend.memcache';


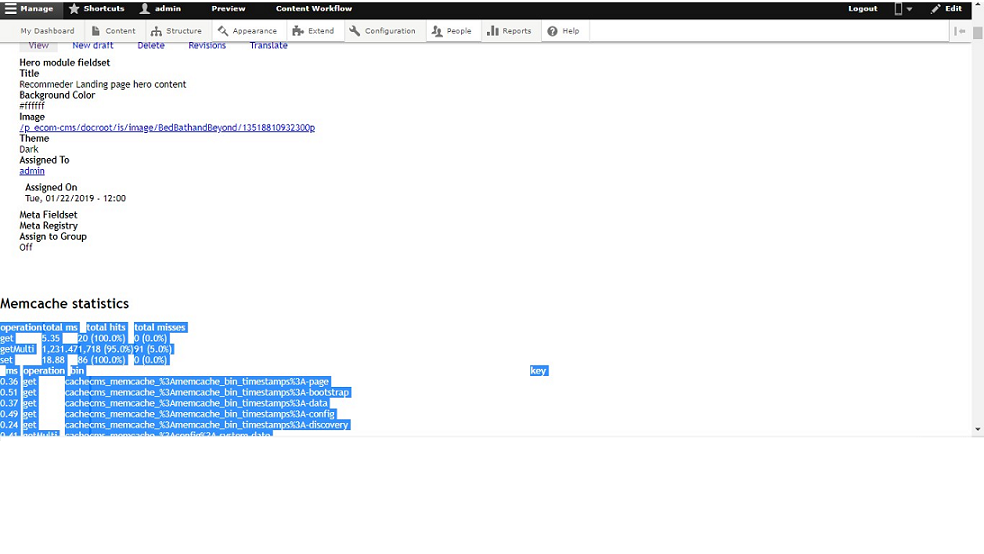
2. Memcache statistics can be seen on the admin > Reports > Memcache Statistics as in screenshot.


3. To enable statistics on all pages. go to admin > config > system > memcache. 


 4. Now visit a single page and see the statistics for that page.
a. First time page load. 


b. After first time page load. 


Now compare the page load time in above both screenshot. After first time load, page is coming from the memcache and page load time has been decreased.


Configuring Memcache and Memcache Storage with Drupal 8
1. Paste the below code after opening the settings.php file.
    // Set’s default cache storage as Memcache and excludes database connection for cache
    $settings['cache']['default'] = 'cache.backend.memcache_storage';
   // Set’s Memcache key prefix for your site and useful in working sites with same memcache as           backend.
   $settings['memcache_storage']['key_prefix'] = '';
  // Set’s Memcache storage server’s.
  $settings['memcache_storage']['memcached_servers'] =  ['127.0.0.1:11211' => 'default'];

2. To debug Memcache, include below code in settings.php file.
// Enables to display total hits and misses
$settings['memcache_storage']['debug'] = TRUE;

Now you can see Memcache messages by debug enabled in above line.

NOTE: Comment memcache settings from settings.php file before uninstalling Memcache and Memcache storage.

Redis Integration with Drupal 8

Redis

  • Redis is a in-memory, key-value data store. Redis is the most popular key-value data store. 
  • Redis is used by all big IT brands in this world. Amazon Elastic Cache supports Redis which makes redis a very powerful and must know key-value data store.
  • Key-Value store is a storage system where data is stored in the form of key and value pairs.
  • In-memory Key-Value store means Key-Value pairs are stored in primary memory (RAM).
  • Redis stores data in the form of Key-Value in RAM.
  • Key: This has to be string
  • Value: This can be string, list, set or hash
  • Example: 
           name="raj"
           skills=["Drupal8", "Drupal7"]
  • In Database Management system, everything got stored in secondary storage due to which read and write operations are very slow But Redis store everything in primary memory and very fast to read/write of data.
  • Redis can only store small textual information which has to access, modify or insert with fast speed because It stores in primary memory which is very expensive and lesser size.
  • Redis Architecture having 2 processes:

              1. Redis client: Redis server is responsible for storing data in memory.
              2. Redis server: Redis client can be redis console client which is responsible for sending and receiving data.

Integrating Redis with Drupal 8

Requirement: 
  • PHP >= 7.0.28
  • Install Phpredi module/extension for PHP to communicate: PHPRedis

Follow below steps:
1. Run command:
       sudo apt-get update
   sudo apt-get upgrade
   sudo apt-get install software-properties-common
   sudo add-get-repository ppa:chris-lea/redis-server
   sudo apt-get update
   sudo apt-get upgrade
2. git clone https://github.com/phpredis/phpredis.git
3. cd phpredis
4. phpize
5. ./configure
6. make
7. make install
8. make test
9. cd ..
10. rm –f phpredis
11. echo “extension=redis.so” > /etc/php/7.0/mods-available/redis.ini
12. ln –sf /etc/php/7.0/mods-available/redis.ini  /etc/php/7.0/fpm/conf.d/20-redis.ini
13. ln –sf /etc/php/7.0/mods-available/redis.ini  /etc/php/7.0/cli/conf.d/20-redis.ini
14. service php7.0-fpm restart
15. put extension=redis.so in /etc/php/7.0/apache2/php.ini
16. Restart apache2
17. Now download Drupal module with drush: drush dl redis. OR go to page: https://www.drupal.org/project/redis
18. Now configure redis in Drupal. Now update settings.php file with following code.

/**
* Redis settings
*/ 
$settings['redis.connection']['interface'] = 'PhpRedis';       // Can be "Predis" in the future
$settings['redis.connection']['host'] = '127.0.0.1';         // Your Redis instance hostname
$settings['cache_prefix'] = 'cms_';         // Optional prefix for cache entries

$settings['cache']['default'] = 'cache.backend.redis';  // The default cache engine for the site
// Always set the fast backend for bootstrap, discover and config, otherwise this gets lost when redis is enabled.
$settings['cache']['bins']['bootstrap']    = 'cache.backend.chainedfast';
$settings['cache']['bins']['discovery']    = 'cache.backend.chainedfast';
$settings['cache']['bins']['config']       = 'cache.backend.chainedfast';
$settings['cache']['bins']['container']       = 'cache.backend.redis';
$settings['cache']['bins']['data']       = 'cache.backend.redis';
$settings['cache']['bins']['default']       = 'cache.backend.redis';
$settings['cache']['bins']['dynamic_page_cache']       = 'cache.backend.redis';
$settings['cache']['bins']['entity']       = 'cache.backend.redis';
$settings['cache']['bins']['menu']       = 'cache.backend.redis';
$settings['cache']['bins']['page']       = 'cache.backend.redis';
$settings['cache']['bins']['render']       = 'cache.backend.redis';
$settings['cache']['bins']['rest']       = 'cache.backend.redis';
$settings['cache']['bins']['signal']       = 'cache.backend.redis';
$settings['cache']['bins']['toolbar']       = 'cache.backend.redis';
$settings['cache']['bins']['ultimate_cron_logger']       = 'cache.backend.redis';

$settings['container_yamls'][] = 'modules/redis/example.services.yml';
$settings['container_yamls'][] = 'modules/redis/redis.services.yml';

//Register our namespace
$class_loader->addPsr4('Drupal\\redis\\', 'modules/redis/src');

19. Start redis-server, run command: redis-server
20. Now in CLI windows: redis-cli monitor. this command will print OK means it is working fine. 

21. Check if redis is configured with Drupal. Go to admin > Reports > Status Report. Click on Status report and see the status report page.


22. Now access any Drupal website page and now you will be able to see the logs as below with the following command: redis-cli. Now this command will take to the redis client terminal.


Now here type below command to see redis cache storage.

Command: keys ‘cms*’ as in below screen shot.


If you want to see specific logs, then run above command as below: keys ‘cms_:entity*’

Monday, 18 March 2019

Manage Drupal 8 Site Configurations

Manage Site Configurations in Drupal 8

Deployment & Configuration management is very important part of every project. 

In Drupal 7, all configurations are stored in database together with content. To manage configurations, we have to work with combination of feature, Strongarm etc. With the help of these modules, configurations can be packaged into special "features".

In Drupal 8, All the configurations are stored in files as well as in Database. Configuration files allows developer to move settings between development to live site easily.

Manage configurations
Everything excluding content, is configuration. Configuration management system in Drupal 8, only help to move configurations from one dev environment to live environment not content.

Using the new system, manage:
  • Site name
  • Content types and settings
  • Fields
  • Block types and settings
  • Modules settings and states
  • Taxonomy vocabularies
  • Permissions
  • Views
  • theme settings

Following things are content:
  • Nodes
  • Users
  • Taxonomy Terms
  • etc.
To move content from one environment to another, we need migration system.

Configuration Management Settings
Drupal 8 having module "Configuration Manager" in core and its helps in maintaining configuration management functionality. Check that this module is enabled. 

Now go to admin > configuration > development > configuration synchronization.
See in screenshot.
In screenshot, This page having below options:
1. To import and export configurations (a full archive or a single one)
2. To synchronize configuration

Drupal 8, stores configurations in table "config" in Database. This configuration management system allows to export complete configuration and store it in YAML files.

Configure "config" folder to store configuration YAMLs files. This folder can configured in settings.php file:
$config_directories['sync'] = 'sites/default/files/config_HASH/sync';
In above line HASH, 
In above line, 
HASH: It is long hash which is generated at the time of installation. This protect configurations from web access.

In above line, 
HASH: It is long hash which is generated at the time of installation. This protect configurations from web access.

Export Configuration: 
  Export configurations manually or use Drush.
  drush cex (or drush config-export).
  Above command will generate YAML files from configs stored in Database. All the configurations are available after above command.
  Commit all these files to the GIT.
  Now there is no configuration changes after committing all the files. Update site name and now go to configuration synchronize page as shown in screenshot. 

Now check difference between ACTIVE and STAGED files.
STAGED Configuration: It is a configuration available in YAML files.
ACTIVE Configuration: It is a current website configuration stored in Database.
Export: All the configurations which are available in Database, saving them to YAML files.
Import: It is opposite to export. It saves configuration from YAML files to Database.
drush cim:
 This command will update site name in Database from YAML files means staged configuration updated to active configuration.

If i want to update staged configs, i have to run export. Export will update YAML files as per Database changes available. Now commit these files.
Steps:
1. Install "configuration manager" module and configure "sync" folfer.
2. Export active configurations and commit all those configuration YAML files from sync directory.
3. Change configuration.
4. drush cex
5. git commit and git push

Non on Live Environment:
1. git pull : pull changed configs
2. drush cim : Import changes into live environment active configuration.
Now development and live environment are both in sync with help of above steps.

Sunday, 17 March 2019

Custom REST Resource with GET and POST Method Drupal 8

REST Resource with GET & POST Method

In custom REST resource created in previous posts, Now in this post GET & POST both are implemented.
Create a file named NodeExamplesRestResource.php in firstcustommodule > src > Plugin > rest > resource.

Annotation for GET:-
<?php
/**
 * @RestResource(
 *   id = "custom_rest_endpoint_get",
 *   label = @Translation("Endpoint GET"),
 *   uri_paths = {
 *     "canonical" = "/api/v1/article/{id}"
 *   }
 * )
 */
Annotation for POST:-
<?php
/**
 * @RestResource(
 *   id = "custom_rest_endpoint_post",
 *   label = @Translation("Endpoint POST"),
 *   serialization_class = "",
 *   uri_paths = {
 *     "https://www.drupal.org/link-relations/create" = "/api/v1/email",
 *   }
 * )
 */

Id and label is common in both, id is unique and it is machine name for our resource and label appears as a resource name in backend. 
uri_path will define unique access / endpoint of our resource and so we do not need to define it routing.yml.

Now Code for file
<?php
/**
 * @file
 * Contains \Drupal\firstcustommodule\Plugin\rest\resource\NodeExamplesRestResource
 *
 */
namespace Drupal\firstcustommodule\Plugin\rest\resource;

use Drupal\Core\Session\AccountProxyInterface;
use Drupal\node\Entity\Node;
use Drupal\rest\ModifiedResourceResponse;
use Drupal\rest\Plugin\ResourceBase;
use Drupal\rest\ResourceResponse;
use Psr\Log\LoggerInterface;
use Symfony\Component\DependencyInjection\ContainerInterface;
use Symfony\Component\HttpKernel\Exception\AccessDeniedHttpException;

/**
 * Provides a resource to get view modes by entity and bundle.
 *
 * @RestResource(
 *   id = "node_example_rest_resource",
 *   label = @Translation("Node Example Create/Update/view Rest Resource"),
 *   serialization_class = "Drupal\node\Entity\Node",
 *   uri_paths = {
 *     "canonical" = "/examples-node-rest-resource",
 *     "https://www.drupal.org/link-relations/create" = "/examples-node-rest-resource"
 *   }
 * )
 */
class NodeExamplesRestResource extends ResourceBase {

  /**
   * A current user instance.
   *
   * @var \Drupal\Core\Session\AccountProxyInterface
   */
  protected $currentUser;

  /**
   * Constructs a new ExampleGetRestResource object.
   *
   * @param array $configuration
   *   A configuration array containing information about the plugin instance.
   * @param string $plugin_id
   *   The plugin_id for the plugin instance.
   * @param mixed $plugin_definition
   *   The plugin implementation definition.
   * @param array $serializer_formats
   *   The available serialization formats.
   * @param \Psr\Log\LoggerInterface $logger
   *   A logger instance.
   * @param \Drupal\Core\Session\AccountProxyInterface $current_user
   *   A current user instance.
   */
  public function __construct(
    array $configuration,
    $plugin_id,
    $plugin_definition,
    array $serializer_formats,
    LoggerInterface $logger,
    AccountProxyInterface $current_user) {
    parent::__construct($configuration, $plugin_id, $plugin_definition, $serializer_formats, $logger);

    $this->currentUser = $current_user;
  }

  /**
   * {@inheritdoc}
   */
  public static function create(ContainerInterface $container, array $configuration, $plugin_id, $plugin_definition) {
    return new static(
      $configuration, $plugin_id, $plugin_definition,
      $container->getParameter('serializer.formats'),
      $container->get('logger.factory')->get('example_node_rest'),
      $container->get('current_user')
    );
  }

  /**
   * Responds to POST requests.
   *
   * @param \Drupal\Core\Entity\EntityInterface $entity
   *   The entity object.
   *
   * @return \Drupal\rest\ModifiedResourceResponse
   *   The HTTP response object.
   *
   * @throws \Symfony\Component\HttpKernel\Exception\HttpException
   *   Throws exception expected.
   */
  public function post($node_data) {
    // You must to implement the logic of your REST Resource here.
    // Use current user after pass authentication to validate access.
   if (!$this->currentUser->hasPermission('access content')) {
     throw new AccessDeniedHttpException();
   }

   if ($node_data->nid->value == '') {
     $node = Node::create([
       'type' => $node_data->type->target_id,
'title' => $node_data->title->value,
'body' => [
  'summary' => '',
  'value' => $node_data->body->value,
  'format' => 'full_html',
],
      ]);      
      $node->save();           
    }
    elseif ($node_data->nid->value != '' && is_int($node_data->nid->value)) 
    {
      $values = \Drupal::entityQuery('node')->condition('nid', $node_data->nid->value)->execute();
      $node_exists = !empty($values);
      if ($node_exists) {
        $node = Node::load($node_data->nid->value);
// Title field set 
$node->setTitle($node_data->title->value);
// Body can now be an array with a value and a format.
// If body field exists.
$body = [
  'value' => $node_data->body->value,
  'format' => 'basic_html',
];
$node->set('body', $body);
$node->save();
//return new ResourceResponse($node);
      }
      else {
        \Drupal::logger('example_node_rest_api')->error('Node nid '.$node_data->nid->value.' not exists' );
return new ResourceResponse(['Error'=>'Node nid not exists']);
      }       
     }
     else {  
       return new ResourceResponse(['Error'=>'Data not corrected']);
     }
     return new ResourceResponse($node);     
  }

 /**
   * Responds to GET requests.
   *
   * Returns a list of bundles for specified entity.
   *
   * @throws \Symfony\Component\HttpKernel\Exception\HttpException
   *   Throws exception expected.
   */
  public function get() {
    // You must to implement the logic of your REST Resource here.
    // Use current user after pass authentication to validate access.
    if (!$this->currentUser->hasPermission('access content')) {
      throw new AccessDeniedHttpException();
    }
    $entities = \Drupal::entityTypeManager()
      ->getStorage('node')
      ->loadMultiple();
    foreach ($entities as $entity) {
      $result[$entity->id()] = $entity->title->value;
    }
    $response = new ResourceResponse($result);
    // In order to generate fresh result every time (without clearing 
    // the cache), you need to invalidate the cache.
    $response->addCacheableDependency($result);
    return $response;
  }
}
After saving above file, resource will start to appear in the resource list. Enable this resource with configuration as shown in screenshot. 

Save this configuration.


Hit the url: localhost/examples-node-rest-resource/?_format=json
and response for the above url which is resource GET request response.

Now see the POST request. Open the above url in REST Client. I have used chrome REST client. 


Resource Request URL: http://drupal8moduledevelopement.dd:8083/examples-node-rest-resource/?_format=json
Method: POST
Parameters:
  Headers: 
    Content-Type: application/json
    x-CSRF-Token: (copy the token from url: domainname/session/token OR domainname/rest/session/token)
authorization: Basic YWRtaW46YWRtaW4=
  Body:
    Body content type: Raw Input
    Format Json: 
{
  "type": [
    {
      "target_id": "article"
    }
  ],
  "title": [
    {
      "value": "Article created by REST API 3rd"
    }
  ],
  "body": [
    {
      "value": "Rest api node create demo 3rd"
    }
  ],
  "nid": [
    {
      "value": ""
    }
  ]
}

Output of above request:
{"nid":[{"value":4}],"uuid":[{"value":"45caea8e-4510-4107-92ce-83a5066f3203"}],"vid":[{"value":8}],"langcode":[{"value":"en"}],"type":[{"target_id":"article","target_type":"node_type","target_uuid":"c
fde2b7b-1839-4a83-a359-4b1416512055"}],"revision_timestamp":[{"value":"2019-03-17T12:57:26+00:00","format":"Y-m-d\\TH:i:sP"}],"revision_uid":[{"target_id":1,"target_type":"user","target_uuid":"52858798-09de-4fe5-81ae-048295f8f5cd","url":"\/user\/1"}],"revision_log":[],"status":[{"value":true}],"title":[{"value":"Article created by REST API "}],"uid":[{"target_id":1,"target_type":"user","target_uuid":"52858798-09de-4fe5-81ae-048295f8f5cd","url":"\/user\/1"}],"created":[{"value":"2019-03-17T12:57:26+00:00","format":"Y-m-d\\TH:i:sP"}],"changed":[{"value":"2019-03-17T12:57:26+00:00","format":"Y-m-d\\TH:i:sP"}],"promote":[{"value":true}],"sticky":[{"value":false}],"default_langcode":[{"value":true}],"revision_translation_affected":[{"value":true}],"path":[{"alias":null,"pid":null,"langcode":"en"}],"body":[{"value":"Rest api node create demo","format":"full_html","processed":"Rest api node create demo","summary":""}],"comment":[{"status":2,"cid":0,"last_comment_timestamp":0,"last_comment_name":null,"last_comment_uid":0,"comment_count":0}],"field_image":[],"field_tags":[]}